Introducing the Skydive Kubernetes Probe
by Aidan Shribman, 01/05/2019In this blog post, I present the Skydive v0.22.0 Kubernetes topology probe which is now production-ready, supporting landscapes that contain up to 1,000 pods. I cover the motivation, capabilities and potential use-cases.
Getting Started
If you don’t already have a Kubernetes cluster, you can setup a
minimal single node cluster for evaluation purposes using minikube.
You will find installation instructions for minikube at
install-minikube.
You will need kubectl to interact with the cluster. You will find
installing instructions for kubectl at
install-kubectl.
Now you can setup Skydive on the cluster using kubectl apply:
kubectl apply -f https://raw.githubusercontent.com/skydive-project/skydive/master/contrib/kubernetes/skydive.yaml
This will result in the deployment of:
- Skydive agent (one per node): collecting host/node information via node probes
- Skydive analyzer (one per cluster): collecting Kubernetes topology via the Kubernetes probe
To expose the Skydive dashboard use kubectl port-forward:
kubectl port-forward service/skydive-analyzer 8082:8082
You can thereafter open your browser at http://localhost:8082 and
view the Skydive dashboard.
Hello World
Let us explore the Kubernetes hello world sample found at hello-minikube
You can create the deployment using kubectl create:
kubectl create deployment hello-node --image=gcr.io/hello-minikube-zero-install/hello-node
And expose hello-node application via hello-world service using kubectl
expose:
kubectl expose deployment hello-node --type=LoadBalancer --port=8080
In the Skydive dashboard you can expand the cluster resource and the default
namespace and then focus the view by setting filter to
G.V().Has("K8s.Labels.app", "hello-node"), resulting in:
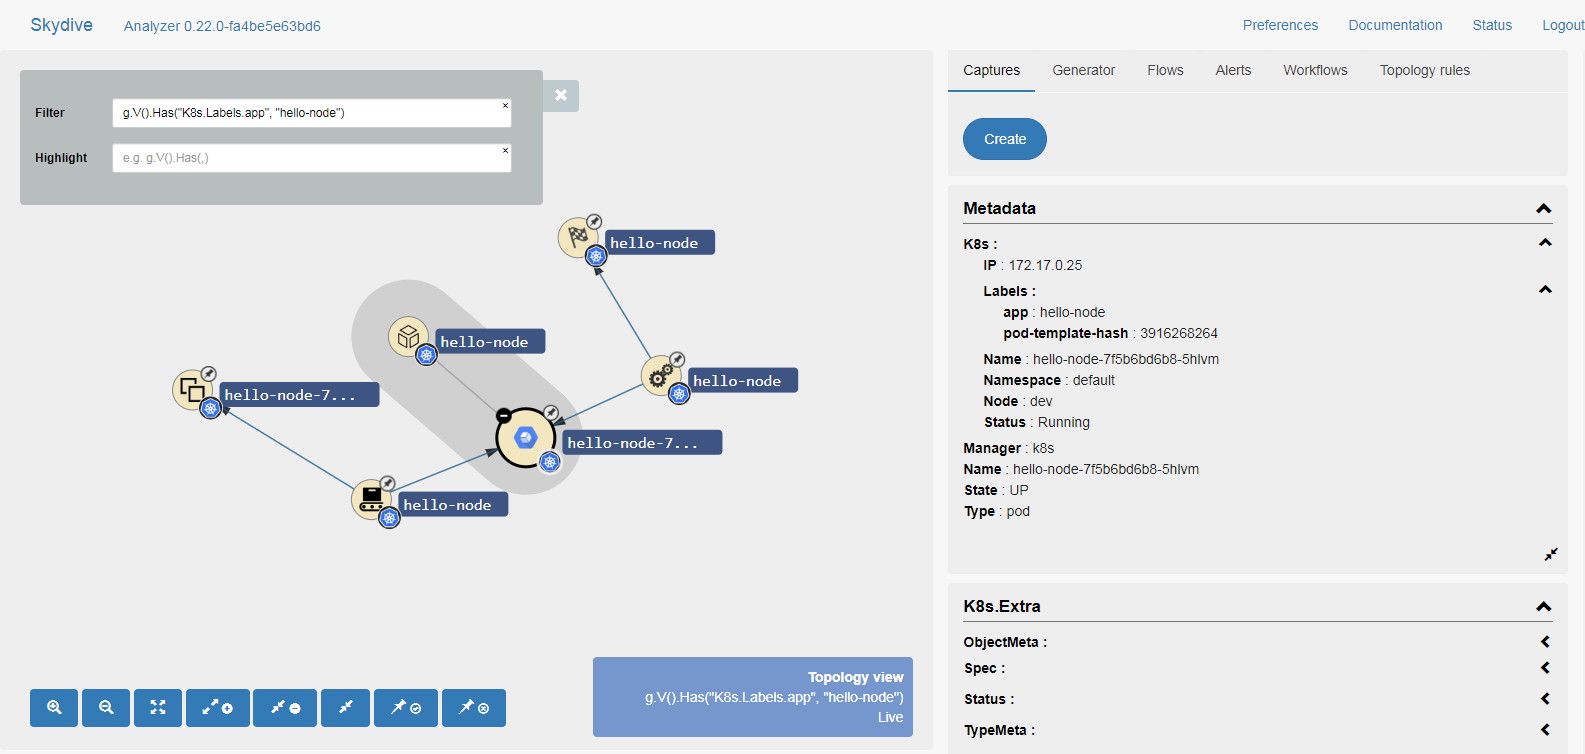
Next you can highlight specific resources as follows:
- hello-node deployment:
G.V().Has("Type", "deployment") - hello-node pods:
G.V().Has("Type", "pod") - hello-world service:
G.V().Has("Type", "service")
Motivation
But before we continue let us pause for a moment and discuss the motivation.
Kubernetes configuration is declarative, consisting of many resources such as the network policy configuration below (a default deny all rule):
apiVersion: networking.Kubernetes.io/v1
kind: NetworkPolicy
metadata:
  name: deny
spec:
  podSelector: {}
  policyTypes:
  - Egress
Tools such as kubectl extract a per-resource declarative configuration, plus
status fields, but lack information about how these resources interact.
For example let us consider the following pods:
apiVersion: core/v1
kind: Pod
metadata:
  name: a
spec:
  ...
---
apiVersion: core/v1
kind: Pod
metadata:
  name: b
spec:
  ...
And given the above network policy and pods it may not be simple to answer
trivial questions, such as whether traffic is allowed to flow from pod:a to
pod:b.
In essence, traffic is denied due to networkpolicy:deny governing both
pod:a and pod:b, as all reside in the default namespace and as the
networkpolicy:deny pod-selector is empty (indicating this applies to all pods
in the namespace).
Using a graph as set out below would help undetstand that networkpolicy:deny
governs pod:a and pod:b:
pod:a <---> networkpolicy:deny <---> pod:b
And looking beyond just network policies, Kubernetes defines relations between resources in many ways:
- namespace/name
- label-selectors
- pod-selectors
- namespace-selectors
- ip-blocks
What makes the Skydive Kubernetes probe unique is that it translates all the declarative relationships into graph edges, thus enabling to better understand the Kubernetes landscape.
Topological Model
The topological view places Kubernetes resources within their correct hierarchical location, e.g. a pod resource will reside within its parent namespace resource. The Kubernetes probe supports the following resources:
- cluster (top level)
  - namespace
    - configmap
    - cronjob
    - deployment
    - daemonset
    - ingress
    - job
    - networkpolicy
    - pod
      - container
    - persistentvolumeclaim
    - replicaset
    - secret
    - service
    - statefulset
  - node
  - persistentvolume
  - storageclass
Additional edges (non-ownership relationships) exist between Kubernetes
resources (e.g. k8s.networkpolicy to k8s.pod) or between Kubernetes
resources and non-Kubernetes resources (e.g. k8s.container to docker).
Exploring Topology
We will now go back to the network policy space to better understand how Skydive Kubernetes helps gain insights, via its graph layout.
What is a Kubernetes network policy? Let us first understand what a Kubernetes network policy is:
- a Kubernetes network policy consists of a set of allow/deny rules
- each rule limited to ingress, egress or both
- each rule applies to a subset of the pods
How is the Kubernetes network policy interpreted? The Kubernetes network policy is interpreted as follows:
- allow if no policy rule exists
- allow if at least one allow policy rule exists
It is not always easy to understand which pods are governed by a specific network policy, as there are many ways this can be defined, such as where:
- pods are in a namespace specified by a namespace-selector
- pods are specified by a pod-selector
- pods are specified by ip-block
Open the WebUI and expand the cluster resource and then the default namespace.
We will use the bookinfo sample, focus your view by applying:
- Filter:
G.V().Has("K8s.Labels.app", "bookinfo") - Highlight:
k8s network
Now you can create the bookinfo sample (enhanced with network policy) by applying:
kubectl apply -f https://raw.githubusercontent.com/istio/istio/release-1.0/samples/bookinfo/platform/kube/bookinfo.yaml
kubectl apply -f https://raw.githubusercontent.com/skydive-project/skydive/master/tests/bookinfo/bookinfo-netpol-deny.yaml
kubectl apply -f https://raw.githubusercontent.com/skydive-project/skydive/master/tests/bookinfo/bookinfo-netpol-details.yaml
kubectl apply -f https://raw.githubusercontent.com/skydive-project/skydive/master/tests/bookinfo/bookinfo-netpol-ratings.yaml
kubectl apply -f https://raw.githubusercontent.com/skydive-project/skydive/master/tests/bookinfo/bookinfo-netpol-reviews-v1.yaml
kubectl apply -f https://raw.githubusercontent.com/skydive-project/skydive/master/tests/bookinfo/bookinfo-netpol-reviews-v2.yaml
kubectl apply -f https://raw.githubusercontent.com/skydive-project/skydive/master/tests/bookinfo/bookinfo-netpol-reviews-v3.yaml
In the following figure, we have set out a default deny network
policy resource and many specific allow network policy resources to
permit traffic only where specifically needed, such as between
productpage to reviews:

Node Status Indicator
A status indicator provides a coloring of the node:
- Up indicated by WHITE
- Down indicated by RED
Open the WebUI and expand the cluster resource and then the default namespace, then apply:
- Filter:
k8s storage - Highlight:
G.V().Has("Name", Regex("task-pv-*"))
Use kubectl apply to create the sample:
kubectl apply -f https://raw.githubusercontent.com/skydive-project/skydive/master/tests/k8s/pv-volume.yaml
kubectl apply -f https://raw.githubusercontent.com/skydive-project/skydive/master/tests/k8s/pv-claim.yaml
kubectl apply -f https://raw.githubusercontent.com/skydive-project/skydive/master/tests/k8s/pv-pod.yaml
When running the sample, you will notice that failed/starting resources are shown in RED (Down), while running resources are shown in WHITE (Up). Let us look at the following figure:
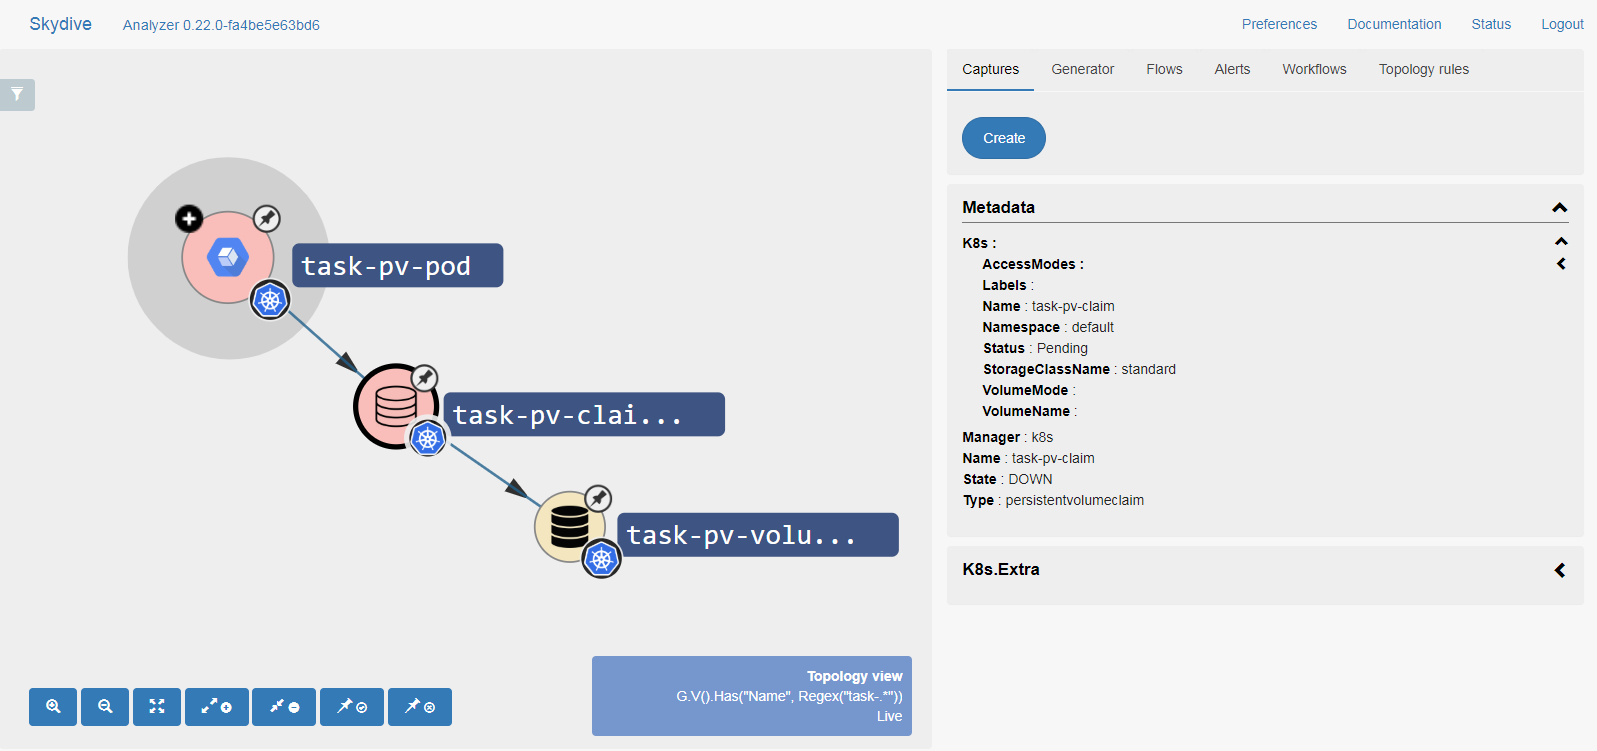
Notice that:
task-pv-poddepends ontask-pv-claimtask-pv-claimdepends ontask-pv-volume
Also notice that:
task-pv-pod: is down (RED)task-pv-claim: is down (RED)task-pv-volume: is up (WHITE)
The combination of dependence graph and status indication allows for root cause
analysis, such as that task-pv-pod is down due to a cascading error eminating
from task-pv-claim being down.
DevOps Automation
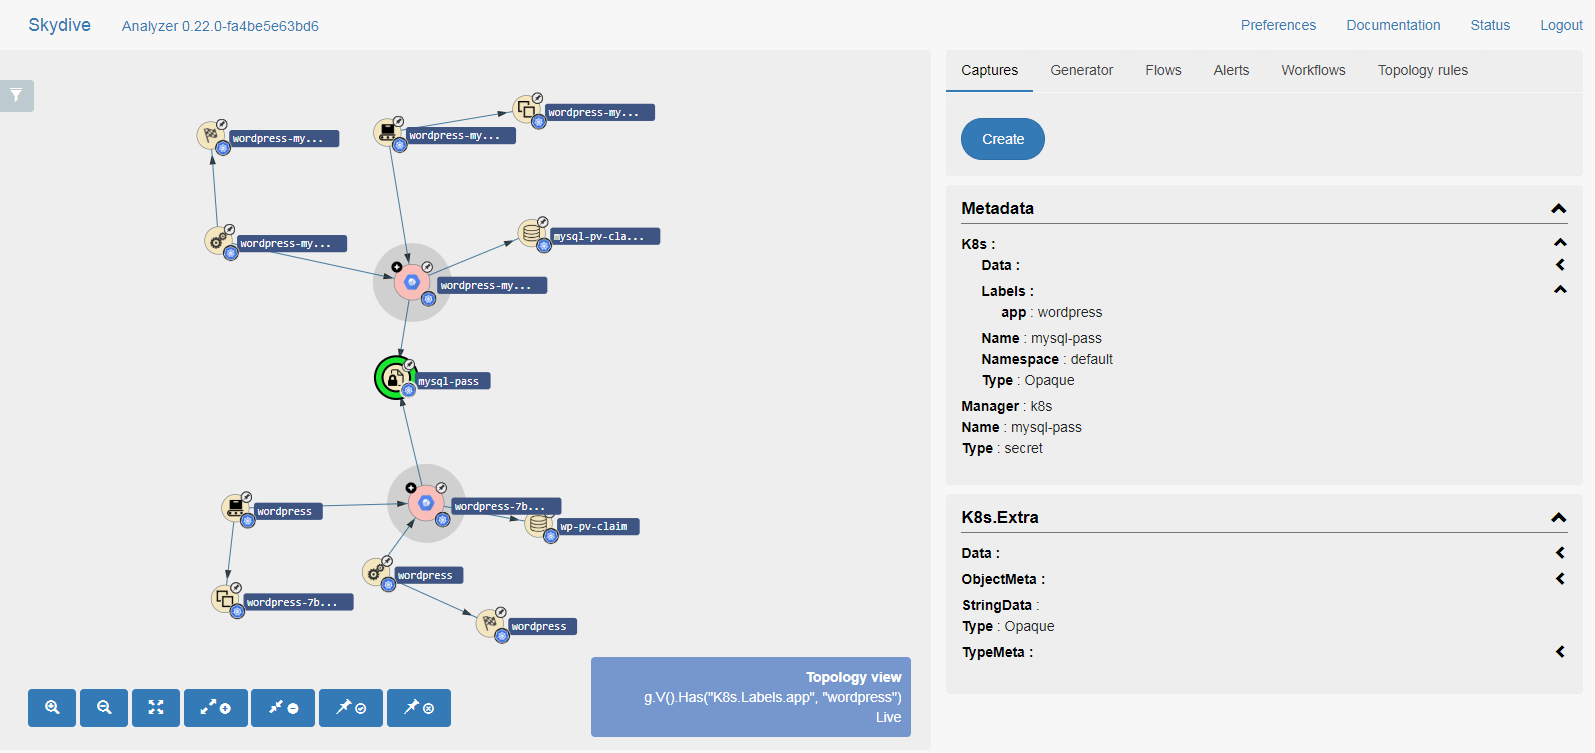
Skydive has a REST API for automation based on the Kubernetes topology model.
We use wordpress sample, now focus your view by applying:
- Filter:
G.V().Has("K8s.Labels.app", "wordpress") - Highlight:
G.V().Has("Type", "secret", "Name", "mysql-pass").In()
Now create the wordpress sample (password abc123):
kubectl create secret generic mysql-pass --from-literal password=abc123
kubectl apply -f https://raw.githubusercontent.com/skydive-project/skydive/master/tests/k8s/mysql-deployment.yaml
kubectl apply -f https://raw.githubusercontent.com/skydive-project/skydive/master/tests/k8s/wordpress-deployment.yaml
Updating passwords on any landscape is standard practice and is typically governed by security regulations.
Next we demonstrate updating the password by re-creating the secret resource (password abc456):
kubectl delete secret mysql-pass
kubectl create secret generic mysql-pass --from-literal password=abc456
We therefore recreated secret:mysql-pass with abc456. However,
the dependant pods were not recreated and still use the old password
abc123.
Enter Skydive REST API!
First, we need to install the Skydive binary:
wget -L0 https://github.com/skydive-project/skydive/releases/download/master/skydive
chmod +x skydive
sudo mv skydive /usr/local/bin/skydive
We don’t use the REST API directly but rather the Skydive client CLI wrapper, and with it we delete all the outdated pods with password abc123 and allow the deployment resources to kick in and create new replacement pods with password abc456:
skydive client query \
	"G.V().Has('Name', 'mysql-pass').In().Has('Type', 'pod')" | \
	jq '.[] | .Metadata.Name' | \
	xargs -n 1 kubectl delete pod
The following figure captures the state of the system after deleting the old pods by our script and after the deployment resources automatically create the new pods (in RED as they have not yet stabilized):
Conclusion
In this blog post we have learnt how to use Skydive Kubernetes probe to gain insights into our Kubernetes cluster, we demonstrated topology exploration, status indications and DevOps automation.